Jainish Vora
I am marketing manager at Phoneier. We at Phoneier curate everything around mobile phones and mobile application, it is one place where you will where you can f
It’s pretty difficult to imagine your iPhone without a microphone. The sole purpose of any phone is to talk to people, but...

Image Credits: pixabay
It’s pretty difficult to imagine your iPhone without a microphone. The sole purpose of any phone is to talk to people, but that obviously dies when the microphone stops working. You will not be able to call anyone or Facetime your friend. The microphone is one of the most essential features of your phone when it stops working; it can cause a lot of inconveniences. Don’t worry about this issue as we bring you a troubleshooting solution with which you can fix your iPhone yourself and continue communicating without any interruption. Microphone Not Working on iPhone can be a problem for anyone.
Before we start with the solutions, you first need to check the problem behind the issue on your iPhone. Read below to learn how to check for the challenge.
There can be two reasons behind your iPhone’s microphone not functioning. First, it could be because of the system glitches or second would be hardware damage. If a glitch is causing the problem, you can resolve a microphone problem through the troubleshooting solutions mentioned in this article.
But if physical or liquid damage is caused to your iPhone, then these solutions will not help you out. If this is the scenario, you have to take your iPhone to the Apple store.
One of the significant issues causing microphone problems in iPhones is cellular connection errors. There might be rogue apps and damaged microphone components that can be causing the issue.
You have to check your iPhone microphones to see if the problem is with a cellular connection or a faulty application or if the problem is with the microphone. There are two microphones on your iPhone one lies in the tip front, which is a receiver. The other microphone is the bottom of your iPhone, which is the primary microphone.
Suggested:
Chossing an iPhone monitoering app.
Step 1: Head to Voice Memos.
Step 2: Click on the record icon to initiate an audio recording.
Step 3: Speak anything in the microphone.
Step 4: After you complete recording your audio, press the play icon to listen to what you have recorded.
If you hear the sound, it means your microphones are alright. But if you hear sound fainting and Siri is unable to detect your voice, it means something is wrong with your microphone. Check the microphone on the upper back corner near the iSight camera. Make sure the microphone is not covered with dust particles, too much dirt can clog your microphone.
If sounds break during a phone call while you use the speaker mode, you need to check if the receiving microphone is not clogged with dirt.
If the test you did was successful and your iPhone’s microphone works you have to go through software problems. When a physical microphone works but still the struggle of hearing audio continues it’s all because of a software glitch or a bug in your system. So we will now check out what exactly troubles an iPhone’s microphone if the microphone stops functioning after you update your iPhone with the latest update. Then probably a bug has been introduced in your system with the new update. Identifying the bug is a challenging part.
The problem could be related to updating of file or how the update was programmed. If that’s the scenario, you cannot do anything only Apple programmers have the capability to debug. Users can only wait for the launch of a bug-free update. But waiting is not the only thing you can do you can also implement a few troubleshooting tricks and check if it eliminates the bug or not.
Suggested:
7 Benefits Of Using A Portable Cell Phone Charger For Your iPhone
In some cases, the problem can be related to a certain application on your iPhone and works fine for other aspects. If this is the case on your phone, you can remove this minor app bug by restarting your iPhone. Also, have some patience and try restarting your device two to three times if it doesn’t work for the first time.
Step 1: Long press the Power button till the Power slider button appears on your screen.
Step 2: Toggle the power slider and power off your iPhone.
Step 3: After waiting for at least 30 seconds again press the Power button and turn on your device.
Restarting your device can fix minor bugs that may have affected your iPhone’s microphone.
Microphone problems can be because of your previous update if that’s the case Apple might have released an update to resolve this bug. If the issue is widespread, Apple will bring the fixed version of the update real quickly. So in order to resolve update your iPhone with the latest version of the update available on your device.

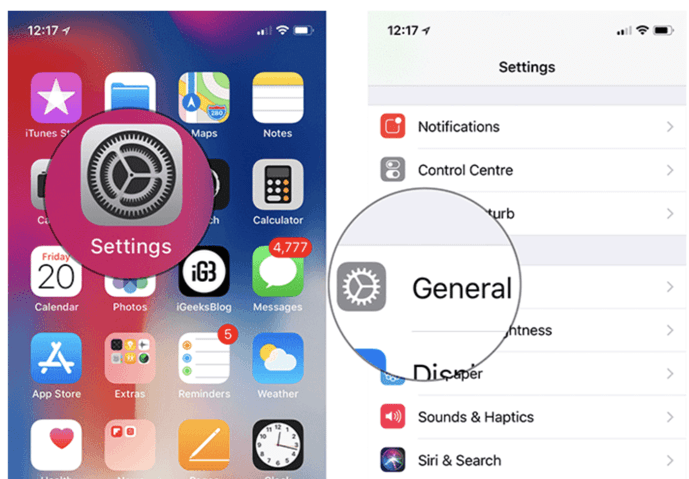
Step 1: First check if a new update is released by iPhone. Head to the setting and go to General.
Step 2: Tap on the software update, here is where you see an available update. You will see a notification for a new iOS version and if it’s available click on it to initiate the update.
Step 3: Before you start with the backup, make sure you have backed up all the content and set it to be on the safer side.
Step 4: Once you are done with the backup, go back to the menu and click on the Download and Install button to install the latest iOS on your iPhone.
While your iPhone is installing, make sure you are connected to strong wi-fi. Also, plug in your iPhone with a power source, so you don’t run out of battery during the update.
If you still haven’t fixed your microphone, try resetting all settings on your iPhone. Resetting your iPhone can come in handy if the latest iOS update has overridden your setting causing the microphone not to work. This method will restore all your settings to default without any change of files and data. Even if it’s not like a factory reset and you are not going to lose any data, it’s better to have a backup to be a safer side.

Step 1: Head to the Setting app and select General.
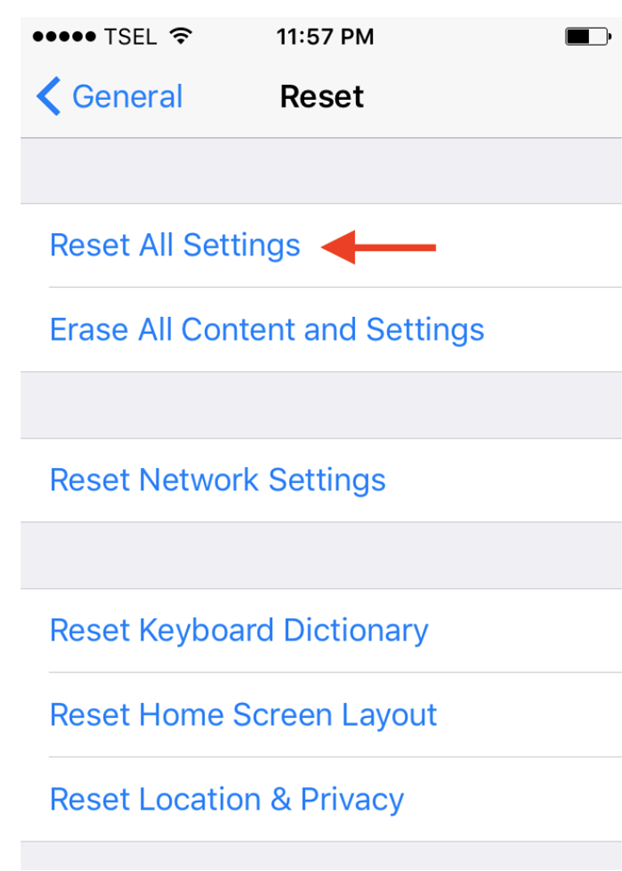
Step 2: Go to the Reset menu and choose Reset All Settings.
Step 3: A pop-up will appear on your screen, type in your passcode, and confirm by tapping on Reset all settings again.
After the Reset is completed, your iPhone will restart. Wait for a while till booting is done and then check if your microphones are fixed, if not don’t worry and try the next step.
If none of the solutions worked for you, then it’s time to perform a factory reset. Factory Reset helps your device start as a new device clearing all kinds of files and data on your iPhone. All your pictures, account information, applications, settings everything will be wiped off. This method is capable of fixing the microphone problem if it’s caused due to a software glitch.
Step 1: Head to settings and click on General.
Step 2: Scroll down to the Reset option and choose to erase all content and settings.
Step 3: Tap Settings, then General. Scroll down until you see Reset.
Step 4: Type in your Apple ID and password in the dialogue box.
Step 5: Wait for a while; the reset process can take a minute or two. Reset time depends on your iPhone’s content. Once done, your iPhone will start new with all default settings.
You can also try the DFU mode restore which is one of the highest types of iOS restore. It’s something you can do if a factory Reset Doesn’t work for you. This method deeply restores the system and is carried by Apple technicians to fix iPhones that are caught with complex software errors.
Note that both of these methods are capable of bringing the ultimate solution, but there’s a chance that the problem still persists and it’s because of damage to a hardware component. You should proceed with these options only if you’re sure that your iPhone has not experienced any physical or liquid damage. You can lose important information, and if the DFU mode restore is interrupted for hardware damage, you might end up having a dysfunctional iPhone.
Suggested:
Is It Possible To Keep An Eye On Someone Using iPhone Spy Apps?
Apart from all the above troubleshooting solutions, there are a few tips and tricks for you to try that might help you bring your iPhone sound back.
There may be a chance that screen protectors or any protection case you used for your iPhone are blocking your microphone. So, in that case, remove those cases, especially if it’s a third-party manufacturer as it might not fit your iPhone properly.
Check if dust particles have accumulated in your microphone. You can remove dirt from the microphone with the help of a toothpick. With light handy, gently push dirt outwards. Take extra care and be as gentle as you can; otherwise, you can damage it even more.
That’s it folks this was all about fixing the iPhone’s microphone, try these methods and check what works for you, If you are not able to solve the problem from any of the above methods, it’s time you go to the Apple customer care and get your device repaired.