When you create your website, the next thing you have to do is create a professional or business email address that contains...

Image Credits: pexels
When you create your website, the next thing you have to do is create a professional or business email address that contains your business name in it. With the help of this article you create your professional email address.
A professional or business email address will help you when you are talking and making deals with other businessmen and customers. Suit-suit allows the user to use Gmail with their professional email address. In this article, we are going to show you how to set up a professional or branded email address with the help of Gmail and G Suit.
An email that contains a business name is called a professional email address. For example,studio@2043studio is a professional email address. Email accounts that are free to use anywhere, like jackyphoto@gmail.com, do not look good for business use; they do not look professional and look bad in business dealings. Your customers and businessmen find a professional email more trustworthy than a regular email address.
If you want to make a professional email, you will need your website and a custom domain. But if you don’t have any websites, Firstly, create a website and attach a domain to it.
If you already have your website and a custom domain name, then you can make your professional email easily.
If you are thinking about why you would use G Suite for a professional email address when most of the hosting companies offer unlimited accounts with your domain name,
The email comes on the list of the most important tools of communication for businessmen. If you have missed any important emails, this can hurt your business. Most of the hosting services are unreliable and less secure. You would not know whether the email you sent is actually delivered or not. To solve this problem, here are G Suite and Gmail.
Gmail is the market leader in the email industry, with 1.5 billion users using Gmail every month. G Suite is an app developed by Google for business owners that includes Gmail, and it is already used by more than 4 million businesses and 79 million students.
These are the benefits of using G Suite for professional email addresses.
If you want a professional email, firstly you’ll have a G Suite account. G Suite costs $5 per user. If you get an annual subscription, then you will get 2 months free. G Suite also gives you a free trial of 14 days, which allows you to test the G Suite and use all its features. If you want to use the G Suite, you have to open the G Suite website on any web browser, click on the start button, and select the plan you want to use.
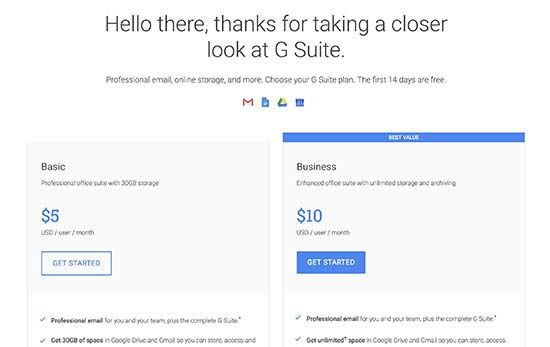
Now you have to enter your business name, and the number of workers or employees working in your office, select the country where you live and select the number of user. If you want only one user or one account or the number of employees. The following step needs you to enter your information, like your name, etc.
After entering the information, you have to choose the domain name. If you have a domain name, then click yes, otherwise no, and register a domain name. If you need to register or buy a new custom domain name, the charges are separately taken. But if you are using an existing domain, then you will have to verify the ownership of the website. Later, we will show you how to verify your site. Now you have to create your G Suite account password by entering your name and password. This username will be your first professional email, so choose the name that you want to use as your professional or business email. Now your G Suite account is successfully created, and you can click on the setup button.
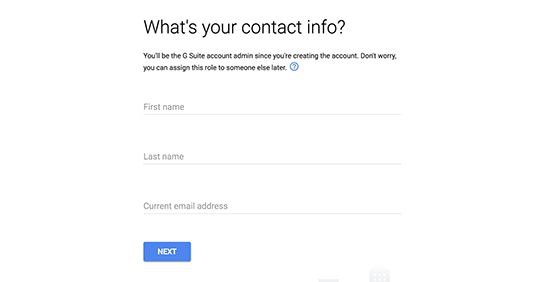
On the next window, you can add more people to your account. If you want to add other employees or workers, you have to create other accounts for them. You can do this here. When you add all the email addresses, click on the Next button. You can add more people later and also add their email addresses when needed. If your domain is registered somewhere else, then you have to verify the ownership of your domain name on your website. After this, an HTML code will appear and you have to paste this code onto your website.
Other ways to verify your website’s ownership. You have to upload an HTML file on your website using the file app on your account dashboard.
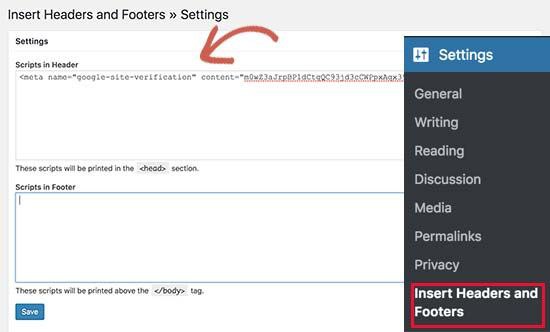
If you don’t have a website and a custom domain, then use the MX record method. You will see step-by-step instructions to add another method when you choose any method. We are assuming that you are working on a WordPress blog and showing you how to add the HTML code to your WordPress.
Go to the admin area and install the headers and footers plugin. For activation, go to the settings and insert the headers and footers pages, then paste the HTML code in the header section and click on the Save button to save your settings.
Now go back to your G Suite setup and click the box. Then you can enter the MX record entries. You can only add the entries if you have an existing domain. Users who register through Google do not need to add any MX records. If your domain is not connected with Google, your email will go in the domain name area and not to Google. You have to set the right and best MX records in your domain settings so Google can send or receive emails to you. To do this, you have to log in to your hosting account on your domain account.
We will show you to add MX records and the basic concept is the same on all hosts and domain accounts. You will see the DNS settings under your domain settings. Login to your hosting dashboard. On another page, click on the manage button below the DNS editor.
Bluehost will open your DNS editor and go back to your G Suite screen and click on the box. It will show all the MX records that you want to enter. There is a link given from which you can see how to add all the records to all the hosting and domain providers. Now you see the information about your Bluehost account. Click on the “Add record” button, enter the record details and click on save it, and repeat the process to add all MX records.
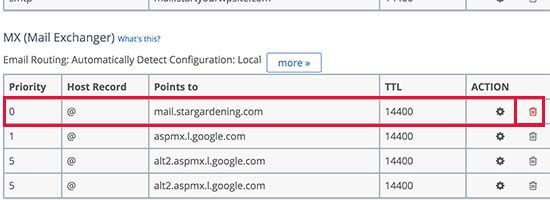
Once you have added all the MX records, go back to the G Suite setup screen and click on the box that says “I have created all the MX records.” You can also delete existing MX records from your website or domain hosting. To delete an MX record, go back to the DNS editor page and scroll to the records. You will see all the MX records that you created. Then click on the button below to delete any MX records. After that, go back to the G Suite screen and click on the button that you have deleted your records.
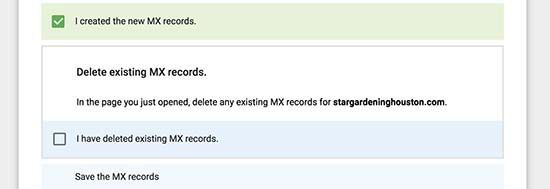
Now save the settings and click on the box that says “I have saved all the MX records.” Now click on the verify button and set up the email to exit the setup section.
Email accounts work similarly to Gmail accounts. You can use this by visiting the Gmail website and logging in with your email address. You can also run your account by going to the console.
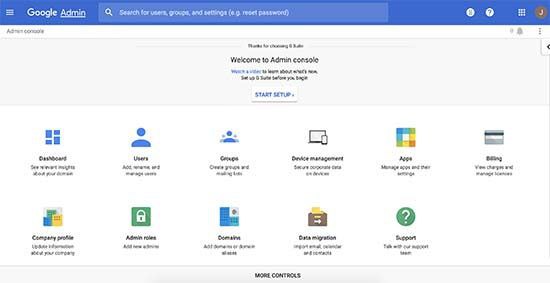
In Google admin, you can add or remove users from your domain. Every user has 30 GB of storage and they can all use the same features, but they cannot access the admin console. You can remove or add any new user you want at any time.
It is possible that the web hosting is not using the dashboard like in the screenshots we have shown above. G Suite will give you detailed documentation for many popular web hosting services. Visit the setup MX records page and then find your domain registrar from the list.
If you don’t find your service provider, then you can ask the help community for help with your domain name.
We hope that this article is helpful for you in the setup of the G Suite for professional email addresses.
Suggested:
How to Free Up Space in Gmail?
How can Google Workspace Admin access your email?